Scaled Solar Panel Installation Robot - Mechanical Design
This project integrated mechanical design with robotics to create a scale solar panel installation robot. The robot successfully transported “solar panels” (160g, 3” x 3” x 0.25” aluminum blocks) between two scale houses with different roofs and a storage block.
This project was completed by designing and 3D printing a 4-bar linkage and gear train to bring an end effector to the three different positions necessary to reach the two houses and storage block. In addition a state machine was programmed in software to handle traversal between the houses and storage block.
Skills needed for this project included SOLIDWORKS design capability, 3D printing for mechanical applications and C++.
The three positions neccessary for the end effector to reach. These were available in a SOLIDWORKS assembly to aid design of the 4-bar linkage. The pictures on the right are of a different robot, but show the same three positions used in the project. Thank you to my friend Evan Seki for allowing me to use these pictures.
Storage block
25 degree house
45 degree house
Mechanical Design Overview
My overarching goal for the mechanical design of the four bar system and gear train was to introduce design constraints that would aid in the success of the project. This way, the amount of arbitrary design decisions could be minimized, thus minimizing “unforeseen” (really unaccounted for) errors in the design. This was essential to the success of the project as the mechanical design was the most foundational part of the project, and had to be completed first before anything else.
The first design constraint introduced was the positionality required for the project to function. This was obtained using the given SOLIDWORKS assembly and defining mates between each end effector and where it needed to be at different times in the project.
Each end effector is mated in the assembly to where we wanted it to be on the 25 degree house, 45 degree house, and the storage block.
Setting up four bar linkage design
From this design constraint the four bar linkage could be initially designed. In the SOLIDWORKS assembly, a new part was created to house the linkage and sketches were created that defined the positions of the end effector in the new part.
From this, the positions of the end effector that defined the four bar linkage were externally defined in reference. However, in order to fully define the four bar linkage with future design constraints (like the gearbox size and position), the external references had to be broken while still retaining necessary dimensions.
With the positions of the end effector captured relative to the robot, further design constraints could be applied to fully define the size and shape of the four bar linkage.
The three positions of the end effector were captured and defined relative to the robot. After over defining the dimensions, the external references were broken, leaving a (currently) under defined sketch that represents the positions of the end effector relative to the robot. Additional design constraints were used to fully define the four bar linkage.
Using additional constraints to fully define
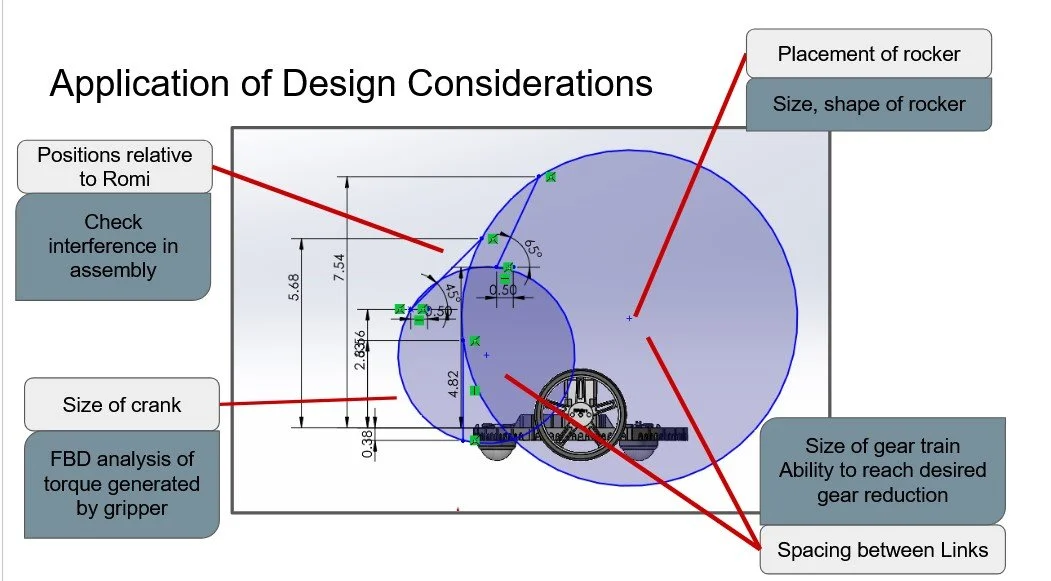
The above design constraint is the most fundamental, and most obvious for the design of the linkage. However, additional constraints were introduced to catch errors in software before time and effort was spent in the physical creation of the linkage and gear train. The biggest design constraint was allowing enough space for the gear train. As the gear train was not designed yet, we chose to design the four-bar linkage and frame that spanned the length of the robot. This fit within the design recommendations offered by our professor, with having around 5 gears, and the maximum gear size being ~2.5 inches.
Design considerations used to reduce the infinite amount of four bar linkages to one that would allow for success.
FBD Analysis for Gear Reduction Requirement
A free body diagram analysis of the end effector with solar panel was used to create the overall gear reduction for the gear train. We analyzed the amount of torque that was generated on the crank when mass was furthest from the crank. We used this with the assumption of four gears in our gear train and an efficiency of 70 percent for the system to generate that at least a 19.2:1 gear train was necessary for the system. This was with a safety factor of four. We chose a 24:1 gear reduction for system as it allowed the design of the compound gear train to be simplified. The maximum amount of torque that the motor could produce was determined by observing the speed of the motor at different torque loads and extrapolating the data to no rotation (stall torque).
Set up for FBD analysis of end effector in “worst” position where the most torque (M) is applied on the crank.
Desiging the Gear Train and FEA of critical gear
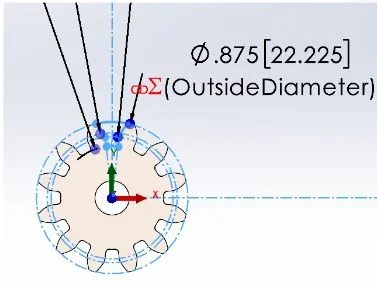
With the overall gear reduction and frame of the system determined the packaging for the gear train could be designed. This was completed with the constraints of the frame for the gear train being a set size, and with some guidelines of no more than a 4:1 gear reduction between gears and a max and min gear size of 2.5 and 5 inches, respectively.
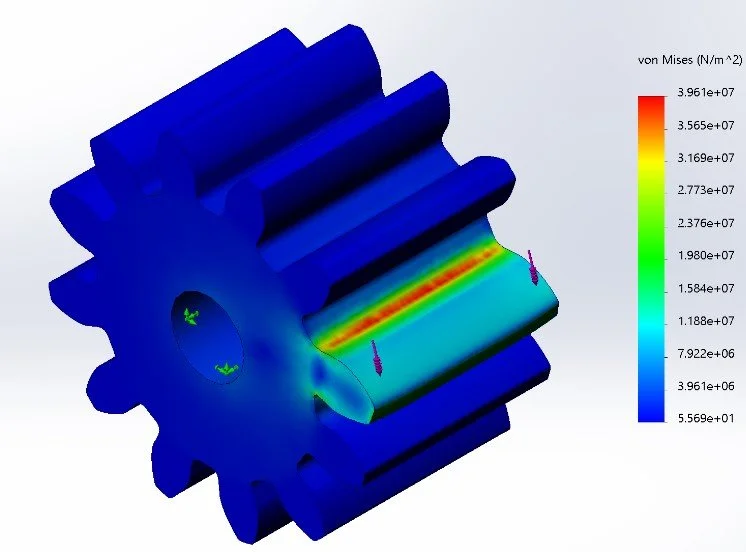
A finite element analysis (FEA) was completed of the gear subject to the most amount of torque in the system. This was completed in SOLIDWORKS and used the Von Mises method to calculate the maximum amount of torque that could be applied to the gear before plastic deformation occurred. A material of PLA was used for the gear. One thing to note is even as the gear was made of the same material, 3D printing introduces directional strength as the material is printed planarly and the highest material strength occurs perpendicular to the layer lines. However, this was considered in the manufacturing of the gears as they were printed such that the torque is always applied perpendicular to the layer lines.
FEA of different loads was tested until the material did not reach the yield strength. This occured at 97N. From this, the distance from the center of the gear was used to calculate the torque that this load would apply. As the yield torque was greater than that of the torque developed by the motor, the gear wouldn’t fail mechanically.
Additional design constraints for the gear train allowed the gear train design to be completed faster and allow for a more robust system. From the many different ways to make the gearbox, only a handful were considered that fit set of constraints.
Additional Constraints
Two additional methods of software analysis were used to apply constraints in software before printing and assembling the parts.
The first constraint was to ensure that the whole system would not interfere with the robot and the arena. This constraint was applied using the interference detection tool in SOLIDWORKS. An assembly was created with the robot, four bar linkage, and geartrain and each of the links were selected to do an interference detection. This uncovered an issue with the crank link, specifically it would interfere with the frame of the robot when the end effector was moved flat.
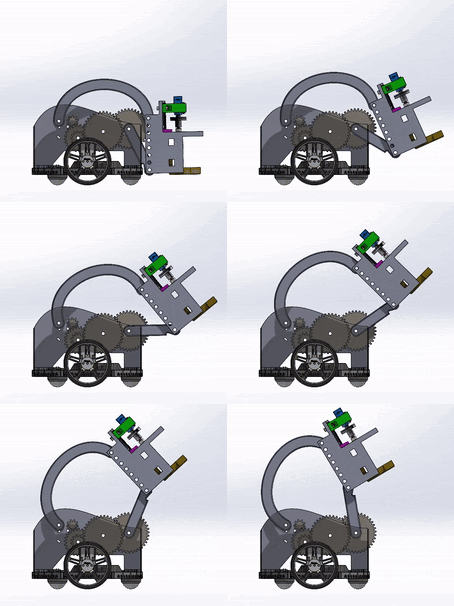
The second constraint was a motion study to ensure that the four bar linkage would not be caught in a point where the mechanism would fold in on itself. This gave a good quick check that during travel through the three positions the four bar was not close to folding in on itself, preventing movement. Another quick check that confirmed the viability of the design was to visually check the motion of the end effector, specifically the angular rate of change of the end effector with respect to the angular rate of change of the crank. I used the motion study to quickly check that it was uniform through the three positions.
Crank with cut-out piece: this feature was added after interference detection analysis.
Motion study was used to ensure that the motion of the linkage through the three positons was as desired.


